- Sensitivity labels for Microsoft Teams – get started – part 1
- Sensitivity labels in Microsoft Teams – part 2: start labelling.
If you already have enabled labelling for Groups and Team sites in Azure, skip to part 2 of this series to see how to use them in Teams.
Information protection in Microsoft Teams is important because it helps ensure the confidentiality, integrity, and availability of sensitive information that is communicated and shared within the platform. Microsoft Teams is a collaborative tool that allows users to chat, make audio and video calls, share files, and collaborate on documents. This means that users may share sensitive information, such as financial data, customer information, or intellectual property either on purpose or by mistake.
With Information protection labels and label policyes we can add some guard rails to mitigate risk of confidential info getting shared with the wrong crowd.
Example scenarios for how you can use sensitivity labels with Teams in your organization include:
But to get started you need to enable this feature inside Azure AD directory otherwise the feature will be unavailable, and you will see this message:
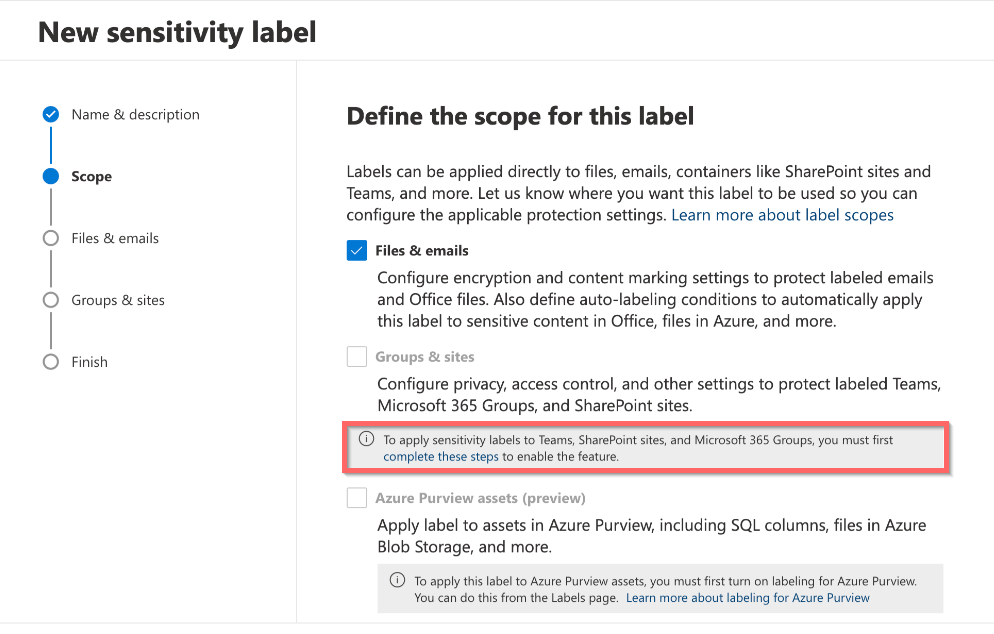
Enable the settings
So lets get started.
I will start by explaining what needs to be done, and then show each command used, as this is done in powershell.
First step is to install the AzureADPreview Powershell module.
#Install AzureADPreview Module using -Force since I already have it installed
Install-Module -Name AzureADPreview -Force -allowclobber

#Login to AzureAD
Connect-AzureAD

#Load Module
Import-Module azureADpreview -Force

#View all available cmdlets
Get-Command -Module azureadpreview
When done you are ready to add the new MIP setting in the template to the Unified Group setting in your directory
So first what is directory level settings ?
Group settings (also called directory settings in beta) are a collection of settings that allow you to configure either tenant-wide or object-specific allowed behaviors for specific Azure AD objects like Microsoft 365 groups.
There are eight groups of setting templates with each setting template including a collection of individual settings.
- Group.Unified
- Group.Unified.Guest
- Application
- Custom Policy Settings
- Consent Policy Settings
- Password Rule Settings
- Prohibited Names Restricted Settings
- Prohibited Names Settings
Microsoft 365 groups settings are configured using a Settings object and a SettingsTemplate object.
To configure Microsoft 365 group settings for your directory, you use the template named “Group.Unified”. To configure Microsoft 365 group settings on a single group, use the template named “Group.Unified.Guest”. This template is used to manage guest access to a Microsoft 365 group.
You can see the available templates by typing Get-AzureADDirectorySettingTemplate
To add the needed EnableMIPLabels and make labelling work in Teams you need to run the following.
#Get the settings template for Group Unified
$TemplateId = (Get-AzureADDirectorySettingTemplate | where { $_.DisplayName -eq "Group.Unified" }).Id
$Template = Get-AzureADDirectorySettingTemplate | where -Property Id -Value $TemplateId -EQ
$Setting = $Template.CreateDirectorySetting()

#Create the new setting
$Setting["EnableMIPLabels"] = "True"
New-AzureADDirectorySetting -DirectorySetting $Setting

#Get current settings
$grpUnifiedSetting = (Get-AzureADDirectorySetting | where -Property DisplayName -Value "Group.Unified" -EQ)
$Setting = $grpUnifiedSetting
$grpUnifiedSetting.Values


#EnableMIPLabels setting for Groups
$Setting["EnableMIPLabels"] = "True"
$Setting.Values
#Save Changes
Set-AzureADDirectorySetting -Id $grpUnifiedSetting.Id -DirectorySetting $Setting
This site is a great ressource to go deeper inside the possible settings https://learn.microsoft.com/en-us/azure/active-directory/enterprise-users/groups-settings-cmdlets
Sync the labels
To sync the labels there is a one time action to be run inside Exchange online security and compliance.
Use the Connect-IPPSSession cmdlet in the Exchange Online PowerShell module to connect to Security & Compliance PowerShell PowerShell using modern authentication. The cmdlet works for MFA or non-MFA enabled accounts.
#Import module and connect
Import-Module ExchangeOnlineManagement
Connect-IPPSSession -UserPrincipalName myuser@mytenant.onmicrosoft.com
#Sync Labels
Execute-AzureAdLabelSync
After this i typically go get some coffe and give a good 15 – 30 minutes wait, before proceding with creating the labels.
But thats it, now you are ready to create, publish and apply the labels not only to documents, but also Teams and Sharepoint sites.